Monday, July 6, 2009

Simple DSL in Scala

Recently I started to use Scala for my hobby-project.I had heard that Scala made it possible to write a code in a way that it looked like a DSL embedded inthe Scala language itself. So I decided to try this feature myself. I needed some concise and convenient API to schedule messages for actors. The following is what I ended up with:

final class TimeSpec[T] (number : Long, action : Long => T) {
def nanoseconds = action (number)
def microseconds = action (number * 1000L)
def miliseconds = action (number * 1000L * 1000L)
def seconds = action (number * 1000L * 1000L * 1000L)
def minutes = action (number * 1000L * 1000L * 1000L * 60L)
def hours = action (number * 1000L * 1000L * 1000L * 60L * 60L)
def days = action (number * 1000L * 1000L * 1000L * 60L * 60L * 24L)
}

final class Trigger (actor : MyActor, payload : Any) {
def in (number : Long) = new TimeSpec[Unit] (number, scheduleIn)
def every (number : Long) = new TimeSpec[Unit] (number, scheduleEvery)

private def scheduleIn (nanos : Long) = Scheduler.inNano (actor, payload, nanos)
private def scheduleEvery (nanos : Long) = Scheduler.everyNano (actor, payload, nanos)
}

final class ActorSchedule (actor : MyActor) {
def payload (payload : Any) = new Trigger (actor, payload)
}

trait MyActor ..... {
protected val schedule = new ActorSchedule (this)
....
}


This code made it possible to schedule messages in a natural way, like:

object TestActor extends MyActor {
schedule payload `Hi in 10 nanoseconds

schedule payload `HowAreYou every 5 seconds

schedule payload `Bye in 5 days

def act () = {
case `Hi => println ("Hello!")
case `HowAreYou => println ("I am fine")
case `Bye => println ("Bye-bye")
}
}

The idea is that schedule is an object of class ActorSchedule. This class has method payload which takes a payload object as its argument. So "schedule payload `Hi" is actually an invocation "schedule.payload(`Hi)". This invocation will create an object of class Trigger. Trigger class has two public methods - in(Long) and every(Long). Because we cannot do anything until a time unit is given, we create an object of TimeSpec class passing to it a method (scheduleIn or scheduleEvery) that is to be run with number of nanoseconds when one of TimeSpec's methods is called. I think this API is concise enough with only small efforts taken to implement it.

Sunday, March 22, 2009

CeBootLin - Linux autoloader for WinCE on Loox 5XX (560/550)

Here is the "bootloader" for wince to boot linux automatically on startup of PDA. It is not real bootloader because it has nothing to do with boot sectors, it is just a wince program which is able to boot linux as soon as possible. I have implemented it in this way because I didn't want to brick my PDA meddling with boot sectors or something. Also I wanted to have a way to skip loading of linux and let wince load itself. So here we are. It works. The code is based on haret (thanks guys!) but I cut off the parts I not used. Because the laoder uses hardware registers (GPIO/CPLD for leds and keybaord) of Fujitsu Siemens Loox N560/C550, it will not work for other PDAs. When CeBootLin is installed and PDA is turned on, wince begins boot process loading applications defined under the HKEY_LOCAL_MACHINE\init registery key. This way it loads CeBootLin. CeBootLin waits for 1 second, blinking with keyboard led. During the keyboard blinking, user can press any button to stop CeBootLin from loading Linux. If no button has been pressed during keyboard blinking, CeBootLin will search for \CeBootLin\default.txt and use this haret script to load Linux.

So, in essence, you should complete the following steps in order to install CeBootLin:
1. Download CeBootLin.
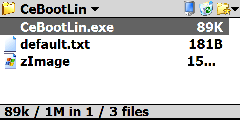
2. Unpack the downloaded archive into the PDA root. The CeBootLin.exe must be reachable with the path \CeBootLin\CeBootLin.exe.
3. Place default.txt under the \CeBootLin directory. The default txt might looks like this (if the Andorid is what you are going to load with CeBootLin):

set MTYPE 1454
set KERNEL "\CeBootLin\zImage"
set CMDLINE "root=179:3 mem=62M rootdelay=3 boot_delay=0 init=/init console=tty0 fbcon=rotate:0 androidboot.console=tty0 android.checkjni=1"
set RAMADDR 0xA0200000
bootlinux

4. Place zImage under the directory \CeBootLin\.

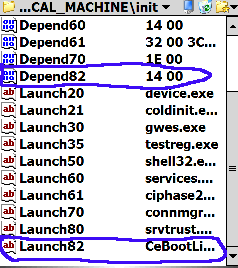
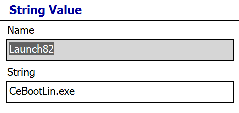
5. Modify HKEY_LOCAL_MACHINE\init adding Launch82 ="CeBootLin.exe" and Depend82 = 14 00.


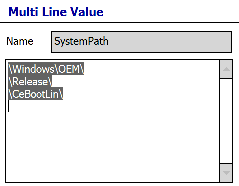
6. Modify HKEY_LOCAL_MACHINE\Loader\SystemPath adding a new directory \CeBootLin\ to the multi-string list.

7. Wait for 5 minutes (WinCE needs time to persist changes to registry).
8. Feel free to reboot your PDA

To test that CeBootLin is able to boot linux at all, run CeBootLin.exe manually.

It looks little bit complicated but later, setup program might be created to ship automatically bootable Andorid on Loox550. But before, Andorid must be polished.

Here is the source code of CeBootLinux. CeBootLinux is licensed with GNU GPL.

Sunday, March 15, 2009

Pictures of Linux and Android on Fujitsu-Siemens Loox N560


Today the desteny of WM5 is only to be replaced with Linux


Haret.. all you need is to press Run


Android on Loox N560


Installation of debian on Loox N560


Installation of debian on Loox N560

Memory tester for Loox N560/C550

Recently I've created a way to test memory for defects on Fujitsu-Siemens Loox N560/C550. Only one who upgraded (or wants to upgrade) PDA's memory from 64M to 128M needs this utility. Using this "util" it is possible to test memory immediately right after memory has been upgraded, without re-flushing WM5/WM6.

So do the following to test your PDA's memory:
1. Download either LooxMem128-v0.zip (to test 128Mb of memory) or LooxMem64-v0.zip (to test 64Mb of memory).
2. Unpack the downloaded archive onto SD.
3. Insert SD into your Loox and reboot it.
4. Don't let PDA fall asleep, start haret.exe which is in the directory where unpacked the archive to.
5. When haret.exe is started press Run.
6. Read the caution when Linux is booted.
7. Make up your mind and then either press RESET (insert a stylus into a hole on the bottom side of the PDA, if you don't want to test memory) or press enter..
WARNING: Poor memory chips might be damaged during the test (that is why you want to test your PDA's memory, isn't it?). None will be responsible for your actions except yourself!!

Note: You have to press any button during the testing process once per 5 or so minutes.
(In a case you need to port the utility on the other platform (not Loox C550/N560) the only thing you have to do is to replace zImage and modify default.txt to let the linux for your platform boot on the target device).)

Saturday, March 14, 2009

Linux Kernel for Fujitsu-Siemens Loox N560/C550 with support for CPLD and builtin leds

I've implemented support for CPLD and leds. htc-gpio driver is used with a custom list of CPLD registers/resources for Fujitsu-Siemens Loox 5XX (N560/C550). Now CPLD interface is available for all other drivers (existing and planned) of the linux/android kernel.

It is interesting how CPLD is implemented in the linux kernel. Actually CPLD is a chip that supports very simple custom logic (and that is the reason why it is much faster than CPU). CPLD chip has a set of input pins and output pins. All these pins are mapped to a region of memory address space. The most important work with CPLD is that modifying values of pins to control devices. This is done setting a value to 0 or 1. In fact, programming of GPIO (general purpose input/output of CPU) is done in the same way: a programmer writes code that sets a GPIO pin to either 0 or 1. Linux kernel already has support for GPIO which provides a set of functions for platform drivers. In addition, GPIO driver provides a way to map any virtual GPIO pin to some custom code that is responsible for handling of setters and getters for the mapped pins. And indeed, that is how htc-egpio driver does the job. The driver leverages gpiolib mapping CPLD registers to GPIO pins. Thanks to this approach, no addition functions are required to work with CPLD. It is enough to use gpio_set_value/.. methods.
After the CPLD driver had been implemented, it was possible to implement a driver for the leds of Loox N560/C550. The leds driver, I implemented, exports a set of functions that other drivers (wifi, gps, bluetooth, pm, ...) are supposed to use to control the leds. Also, the leds driver makes it possible to control the leds from userspace (shell scripts, java program, ...) using files under sysfs filesystem.

The following is the list of files exported by the leds driver and the possible content values for the each file:
/sys/devices/platform/loox5xx-leds.1/keyboard: on, off, any
- backlight for keyboard

/sys/devices/platform/loox5xx-leds.1/left_green: on, off, any
- green led on the left side. WM5 indicates WiFi activity with this led

/sys/devices/platform/loox5xx-leds.1/left_blue: on, off, any
- blue led on the left side. WM5 indicates Bluetooth activity with this led

/sys/devices/platform/loox5xx-leds.1/left_orange: on, off, any
- orange led on the left side. WM5 indicates GPS activity with this led on Loox N560

/sys/devices/platform/loox5xx-leds.1/right_green: on, off, any
- green led on the right side. WM5 allows programs to control this led using winapi.

/sys/devices/platform/loox5xx-leds.1/right_orange: on, off, blink, any
- orange led on the left side. WM5 indicates charging activity with this led

Where:
on - the led is on regardless of the kernel activity,
off - the led is off regardless of the kernel activity,
blink - the led is blinking regardless of the kernel activity,
any - the led is controlled by the kernel.

For instance, if the content of the right_orange file is set to 'on', then the orange led (on right side of PDA) will be on no matter what you do: plug or unplug your device to/from a cradle. The driver will hold on the state of the led until, you write 'any' into the file right_orange. With 'any' value in file, the first 'power' event will change state of the led. The interface of the driver makes it possible to implement any notification (low battery, new mail..) effects you can imagine involving all leds of the device. The following script demonstrates how to blink with the keyboard backlight led:

while true;
do echo on > /sys/devices/platform/loox5xx-leds.1/keyboard;
sleep 0.1;
echo off > /sys/devices/platform/loox5xx-leds.1/keyboard;
sleep 0.1;
# Condition for break...
done
echo any > /sys/devices/platform/loox5xx-leds.1/keyboard;

The current patch for the android cupcake kernel is located here.

Tuesday, March 10, 2009

Cross-Packaging On Debian

Debian/Emdebian already has tons of packages. But sometimes you have a need to package or repackage a piece of software yourself. The following may be helpful if a platform you build for is not the platform you build on.

Use the following command to build a package from a repository of apt:
emsource --arch armel -b memtester

If you need to install a package for target on your host:

dpkg-cross -a armel -i zlib1g-dev_1.2.3.3.dfsg-13em1_armel.deb
The command dpkg -l | grep zlib1g will show you:

ii zlib1g-dev-armel-cross 1:1.2.3.3.dfsg-13em1

(dpkg-cross automatically converts package names and moves content under the /usr/arm-linux-gnueabi (for armel target))

You need to configure ~/.apt-cross/emsource to use emsource without privileges of root. The content of the file may look like:

workingdir: /home/akshaal/.apt-cross-working-dir

In a case you need to build a package from sources that have already been downloaded, use the following command:

dpkg-buildpackage -aarmel

Sunday, March 8, 2009

Install emdebian on ARM device

Here is how I've successfully installed emdebian on my Fujitsu-Siemens Loox N560. I assume there is an already installed emdebian-tools package and cross-compilers. Next thing is to run the following commands:
cd /tmp;
mkdir grip/
sudo debootstrap --arch=arm --foreign lenny grip/ http://www.emdebian.org/grip/
cd grip/
sudo tar -czf /tmp/emdebian-grip-arm-debootstrap.tgz .

Then SD card is to be partitioned with fdisk. For example it could be:

cfdisk /dev/sdX
mkfs.ext3 /dev/sdXy

where sdX - is a device for an SD card. And sdXy is a partition that is supposed to be used for linux on the SD card. Then mount the linux partition and untar the emdebian-grip-arm-debootstrap.tgz:

mount /dev/sdXy /mnt
cd /mnt
tar zxpvf /tmp/emdebian-grip-arm-debootstrap.tgz
ln -s bin/sh init
cd /tmp
umount /mnt

Now we can boot linux from the partition. When linux has booted and a command line appeared, run the following commands step by step:
cd /debootstrap
export PATH=/usr/local/sbin:/usr/local/bin:/usr/sbin:/usr/bin:/sbin:/bin
run ./debootstrap --second-stage
dpkg --configure -a
rm /init
cd /
ln -s sbin/init init

Now it is time to reboot linux again. This time a login prompt should work. Use root login and no password. Then configure basic settings:

echo 'nameserver 1.1.1.1' > /etc/resolv.conf
echo '127.0.0.1 localhost' > /etc/hosts
echo '172.16.0.2 myhost 172.16.0.2' >> /etc/hosts
echo 'myhost' > /etc/hostname

use actual nameserver IP instead of 1.1.1.1. Reboot PDA one more time. Then configure network:

ifconfig usb0 172.16.0.1 netmask 255.255.255.0
route add default gw 172.16.0.1
Make sure network is up and running. Then upgrade your installation:

echo 'deb http://www.emdebian.org/grip/ sid main' > /etc/apt/sources.list
apt-get update
apt-get dist-upgrade
apt-get install ...whateveryoulike...

And configure network properly.
cat > /etc/network/interfaces
auto lo
iface lo inet loopback
allow-hotplug usb0
iface usb0 inet static
address 172.16.0.2
netmask 255.255.255.0
network 127.16.0.0
broadcast 172.16.0.255
gateway 172.16.0.1
dns-nameservers 1.1.1.1
dns-search your.domain