Showing posts with label linux. Show all posts

Wednesday, January 20, 2010

nut & ippon

It was tricky to make nut 2.4.1 work with IPPON Power PRO 1000 using USB interface.

Any driver (blazer_usb, megatec_usb) failed with the message:
Can't claim USB device [xxxx:yyyy]: could not detach kernel driver from interface 0: Operation not permitted

It turned out, that nut came with the broken configuration for udev 150 (on debian). To fix the problem, I commented out all lines in /etc/udev/rules.d/52-nut-usbups.rules, and created a new file with the name /etc/udev/rules.d/46-ippon.rules and the following content:

SUBSYSTEM=="usb", ATTR{idVendor}=="0665", ATTR{idProduct}=="5161", MODE="0664", GROUP="nut"

This helped. Required product id and vendor id are discovered from the output of lsusb program.

PS. The following alias is very useful when configuring something with udev:
alias udevinfo="udevadm info -a -n"
and it can be used like:
udevinfo /dev/sda

Thursday, November 26, 2009

Upgrade of Firefox

After apt-get dist-upgrade I got this "Could not initialize the browser's security component. The most likely cause is problems with files in your browser's profile directory. Please check that this directory has no read/write restrictions and your hard disk is not full or close to full. It is recommended that you exit the browser and fix the problem. If you continue to use this browser session, you might see incorrect browser behavior when accessing security features."

I tried many possible solutions discovered in internet, but the only thing helped was removing of secmod.db file from my profile directory of firefox. I have no idea what this file is for, but it works. If you are having the same problem, backup your ~/.mozilla directory first before trying this or other solution which involves removing of files.

Friday, October 2, 2009

Auto-mount with halevt

halevt is good piece of software but by default it mounts disks in a way very inconvenient for me - that is mount points are like '/media/disk' '/media/disk-1/ '/media/disk-2' and so on. In order to help myself find disks more easily I've reconfigured halevt and created a script. Now I have /media/Cruzer-d4ba-1 and /media/Cruzer-a5e1-1 mountpoints for my two Sandisk USB sticks. And there are SD_Reader-a6a1-1, SD_Reader-a6a1-2, SD_Reader-a6a1-3 (three partitions) for the SD card I've inserted into a reader. A mountpoint name is composed by concatenating storage model name, short version of storage serial id and partition number. This is done by the following script (~/bin/halevt-mount-helper):
#!/bin/sh

STORAGE=`hal-get-property --udi "$1" --key block.storage_device`
PARTITION=`hal-get-property --udi "$1" --key volume.partition.number`
UUID=`hal-get-property --udi "$STORAGE" --key storage.serial | md5sum | head -c 4`
MODEL=`hal-get-property --udi "$STORAGE" --key storage.model | sed 's/ /_/g' | sed 's/^USB_//g'`

MPOINT="$MODEL-$UUID-$PARTITION"

halevt-mount -u "$1" -p "$MPOINT" -o sync -m 007
The script is used by configuring halevt with the following line instead of the default "halevt:insertion" line in halevt configuration file (/etc/halevt/halevt.xml or ~/.halevt/halevt.xml):
   <halevt:insertion exec="halevt-mount-helper $hal.udi$">

Sunday, March 22, 2009

CeBootLin - Linux autoloader for WinCE on Loox 5XX (560/550)

Here is the "bootloader" for wince to boot linux automatically on startup of PDA. It is not real bootloader because it has nothing to do with boot sectors, it is just a wince program which is able to boot linux as soon as possible. I have implemented it in this way because I didn't want to brick my PDA meddling with boot sectors or something. Also I wanted to have a way to skip loading of linux and let wince load itself. So here we are. It works. The code is based on haret (thanks guys!) but I cut off the parts I not used. Because the laoder uses hardware registers (GPIO/CPLD for leds and keybaord) of Fujitsu Siemens Loox N560/C550, it will not work for other PDAs. When CeBootLin is installed and PDA is turned on, wince begins boot process loading applications defined under the HKEY_LOCAL_MACHINE\init registery key. This way it loads CeBootLin. CeBootLin waits for 1 second, blinking with keyboard led. During the keyboard blinking, user can press any button to stop CeBootLin from loading Linux. If no button has been pressed during keyboard blinking, CeBootLin will search for \CeBootLin\default.txt and use this haret script to load Linux.

So, in essence, you should complete the following steps in order to install CeBootLin:
1. Download CeBootLin.
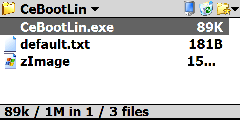
2. Unpack the downloaded archive into the PDA root. The CeBootLin.exe must be reachable with the path \CeBootLin\CeBootLin.exe.
3. Place default.txt under the \CeBootLin directory. The default txt might looks like this (if the Andorid is what you are going to load with CeBootLin):

set MTYPE 1454
set KERNEL "\CeBootLin\zImage"
set CMDLINE "root=179:3 mem=62M rootdelay=3 boot_delay=0 init=/init console=tty0 fbcon=rotate:0 androidboot.console=tty0 android.checkjni=1"
set RAMADDR 0xA0200000
bootlinux

4. Place zImage under the directory \CeBootLin\.

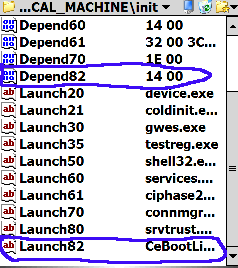
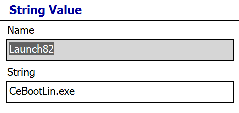
5. Modify HKEY_LOCAL_MACHINE\init adding Launch82 ="CeBootLin.exe" and Depend82 = 14 00.


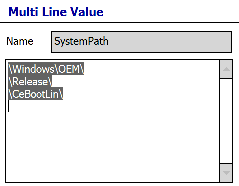
6. Modify HKEY_LOCAL_MACHINE\Loader\SystemPath adding a new directory \CeBootLin\ to the multi-string list.

7. Wait for 5 minutes (WinCE needs time to persist changes to registry).
8. Feel free to reboot your PDA

To test that CeBootLin is able to boot linux at all, run CeBootLin.exe manually.

It looks little bit complicated but later, setup program might be created to ship automatically bootable Andorid on Loox550. But before, Andorid must be polished.

Here is the source code of CeBootLinux. CeBootLinux is licensed with GNU GPL.

Sunday, March 15, 2009

Pictures of Linux and Android on Fujitsu-Siemens Loox N560


Today the desteny of WM5 is only to be replaced with Linux


Haret.. all you need is to press Run


Android on Loox N560


Installation of debian on Loox N560


Installation of debian on Loox N560

Memory tester for Loox N560/C550

Recently I've created a way to test memory for defects on Fujitsu-Siemens Loox N560/C550. Only one who upgraded (or wants to upgrade) PDA's memory from 64M to 128M needs this utility. Using this "util" it is possible to test memory immediately right after memory has been upgraded, without re-flushing WM5/WM6.

So do the following to test your PDA's memory:
1. Download either LooxMem128-v0.zip (to test 128Mb of memory) or LooxMem64-v0.zip (to test 64Mb of memory).
2. Unpack the downloaded archive onto SD.
3. Insert SD into your Loox and reboot it.
4. Don't let PDA fall asleep, start haret.exe which is in the directory where unpacked the archive to.
5. When haret.exe is started press Run.
6. Read the caution when Linux is booted.
7. Make up your mind and then either press RESET (insert a stylus into a hole on the bottom side of the PDA, if you don't want to test memory) or press enter..
WARNING: Poor memory chips might be damaged during the test (that is why you want to test your PDA's memory, isn't it?). None will be responsible for your actions except yourself!!

Note: You have to press any button during the testing process once per 5 or so minutes.
(In a case you need to port the utility on the other platform (not Loox C550/N560) the only thing you have to do is to replace zImage and modify default.txt to let the linux for your platform boot on the target device).)

Saturday, March 14, 2009

Linux Kernel for Fujitsu-Siemens Loox N560/C550 with support for CPLD and builtin leds

I've implemented support for CPLD and leds. htc-gpio driver is used with a custom list of CPLD registers/resources for Fujitsu-Siemens Loox 5XX (N560/C550). Now CPLD interface is available for all other drivers (existing and planned) of the linux/android kernel.

It is interesting how CPLD is implemented in the linux kernel. Actually CPLD is a chip that supports very simple custom logic (and that is the reason why it is much faster than CPU). CPLD chip has a set of input pins and output pins. All these pins are mapped to a region of memory address space. The most important work with CPLD is that modifying values of pins to control devices. This is done setting a value to 0 or 1. In fact, programming of GPIO (general purpose input/output of CPU) is done in the same way: a programmer writes code that sets a GPIO pin to either 0 or 1. Linux kernel already has support for GPIO which provides a set of functions for platform drivers. In addition, GPIO driver provides a way to map any virtual GPIO pin to some custom code that is responsible for handling of setters and getters for the mapped pins. And indeed, that is how htc-egpio driver does the job. The driver leverages gpiolib mapping CPLD registers to GPIO pins. Thanks to this approach, no addition functions are required to work with CPLD. It is enough to use gpio_set_value/.. methods.
After the CPLD driver had been implemented, it was possible to implement a driver for the leds of Loox N560/C550. The leds driver, I implemented, exports a set of functions that other drivers (wifi, gps, bluetooth, pm, ...) are supposed to use to control the leds. Also, the leds driver makes it possible to control the leds from userspace (shell scripts, java program, ...) using files under sysfs filesystem.

The following is the list of files exported by the leds driver and the possible content values for the each file:
/sys/devices/platform/loox5xx-leds.1/keyboard: on, off, any
- backlight for keyboard

/sys/devices/platform/loox5xx-leds.1/left_green: on, off, any
- green led on the left side. WM5 indicates WiFi activity with this led

/sys/devices/platform/loox5xx-leds.1/left_blue: on, off, any
- blue led on the left side. WM5 indicates Bluetooth activity with this led

/sys/devices/platform/loox5xx-leds.1/left_orange: on, off, any
- orange led on the left side. WM5 indicates GPS activity with this led on Loox N560

/sys/devices/platform/loox5xx-leds.1/right_green: on, off, any
- green led on the right side. WM5 allows programs to control this led using winapi.

/sys/devices/platform/loox5xx-leds.1/right_orange: on, off, blink, any
- orange led on the left side. WM5 indicates charging activity with this led

Where:
on - the led is on regardless of the kernel activity,
off - the led is off regardless of the kernel activity,
blink - the led is blinking regardless of the kernel activity,
any - the led is controlled by the kernel.

For instance, if the content of the right_orange file is set to 'on', then the orange led (on right side of PDA) will be on no matter what you do: plug or unplug your device to/from a cradle. The driver will hold on the state of the led until, you write 'any' into the file right_orange. With 'any' value in file, the first 'power' event will change state of the led. The interface of the driver makes it possible to implement any notification (low battery, new mail..) effects you can imagine involving all leds of the device. The following script demonstrates how to blink with the keyboard backlight led:

while true;
do echo on > /sys/devices/platform/loox5xx-leds.1/keyboard;
sleep 0.1;
echo off > /sys/devices/platform/loox5xx-leds.1/keyboard;
sleep 0.1;
# Condition for break...
done
echo any > /sys/devices/platform/loox5xx-leds.1/keyboard;

The current patch for the android cupcake kernel is located here.

Tuesday, March 10, 2009

Cross-Packaging On Debian

Debian/Emdebian already has tons of packages. But sometimes you have a need to package or repackage a piece of software yourself. The following may be helpful if a platform you build for is not the platform you build on.

Use the following command to build a package from a repository of apt:
emsource --arch armel -b memtester

If you need to install a package for target on your host:

dpkg-cross -a armel -i zlib1g-dev_1.2.3.3.dfsg-13em1_armel.deb
The command dpkg -l | grep zlib1g will show you:

ii zlib1g-dev-armel-cross 1:1.2.3.3.dfsg-13em1

(dpkg-cross automatically converts package names and moves content under the /usr/arm-linux-gnueabi (for armel target))

You need to configure ~/.apt-cross/emsource to use emsource without privileges of root. The content of the file may look like:

workingdir: /home/akshaal/.apt-cross-working-dir

In a case you need to build a package from sources that have already been downloaded, use the following command:

dpkg-buildpackage -aarmel

Sunday, March 8, 2009

Install emdebian on ARM device

Here is how I've successfully installed emdebian on my Fujitsu-Siemens Loox N560. I assume there is an already installed emdebian-tools package and cross-compilers. Next thing is to run the following commands:
cd /tmp;
mkdir grip/
sudo debootstrap --arch=arm --foreign lenny grip/ http://www.emdebian.org/grip/
cd grip/
sudo tar -czf /tmp/emdebian-grip-arm-debootstrap.tgz .

Then SD card is to be partitioned with fdisk. For example it could be:

cfdisk /dev/sdX
mkfs.ext3 /dev/sdXy

where sdX - is a device for an SD card. And sdXy is a partition that is supposed to be used for linux on the SD card. Then mount the linux partition and untar the emdebian-grip-arm-debootstrap.tgz:

mount /dev/sdXy /mnt
cd /mnt
tar zxpvf /tmp/emdebian-grip-arm-debootstrap.tgz
ln -s bin/sh init
cd /tmp
umount /mnt

Now we can boot linux from the partition. When linux has booted and a command line appeared, run the following commands step by step:
cd /debootstrap
export PATH=/usr/local/sbin:/usr/local/bin:/usr/sbin:/usr/bin:/sbin:/bin
run ./debootstrap --second-stage
dpkg --configure -a
rm /init
cd /
ln -s sbin/init init

Now it is time to reboot linux again. This time a login prompt should work. Use root login and no password. Then configure basic settings:

echo 'nameserver 1.1.1.1' > /etc/resolv.conf
echo '127.0.0.1 localhost' > /etc/hosts
echo '172.16.0.2 myhost 172.16.0.2' >> /etc/hosts
echo 'myhost' > /etc/hostname

use actual nameserver IP instead of 1.1.1.1. Reboot PDA one more time. Then configure network:

ifconfig usb0 172.16.0.1 netmask 255.255.255.0
route add default gw 172.16.0.1
Make sure network is up and running. Then upgrade your installation:

echo 'deb http://www.emdebian.org/grip/ sid main' > /etc/apt/sources.list
apt-get update
apt-get dist-upgrade
apt-get install ...whateveryoulike...

And configure network properly.
cat > /etc/network/interfaces
auto lo
iface lo inet loopback
allow-hotplug usb0
iface usb0 inet static
address 172.16.0.2
netmask 255.255.255.0
network 127.16.0.0
broadcast 172.16.0.255
gateway 172.16.0.1
dns-nameservers 1.1.1.1
dns-search your.domain

Linux Kernel for Fujitsu-Siemens Loox N560/C550 with usbnet working

After 3 days of struggle I am finally able to build a linux kernel for my PDA Fujitsu-Siemens Loox N560. The kernel has been downloaded from http://www.asm32.ru and patched (pxa27x_udc.c) to support for usbnet (host-to-PDA networking through a usb coard). Also I've made a diff file with differences between the current cupcake kernel and the kernel (by date 02-mar-2009) from asm32.ru site. That will be useful later when I need to apply support for Loox to a new upstream cupcake kernel. Here is the patch which also includes support for usbnet on Loox C550/N560. The patch already contains a kernel configuration file (.config), but usbnet support is not enabled there. Here is the other .config file which is differ from that included in the patch by supporting usbnet, having power management switched off and configuration for larger fonts in console.

It is possible to build the kernel with any toolchain for arm of your choice. I've tried crosstool-ng, emdebian and the one that is included in the android repo. I have decided to leverage emdebian toolchain for I use debian on my PC. The following is the command to build the kernel using emdebian toolchain:
make ARCH=arm CROSS_COMPILE=arm-linux-gnueabi-
Of course you have to have emdebian toolchain installed. You can install emdebian something like it is shown below:

apt-get install emdebian-tool
emsetup --arch arm
Then add:

deb http://www.emdebian.org/debian/ unstable main

into your /etc/apt/sources.list and run:
apt-get install linux-kernel-headers-arm-cross gcc-4.2-arm-linux-gnu

When the kernel is built and ready you can copy it on an SD card and run it with haret with the following default.txt:

set MTYPE 1454
set KERNEL zImage
set CMDLINE "root=179:2 mem=60M rootdelay=3 boot_delay=0 init=/init console=tty0 fbcon=rotate:0 androidboot.console=tty0 android.checkjni=1"
set RAMADDR 0xA0200000
bootlinux
That is important! When you've placed zImage on an SD card, you will insert the card in your PDA. And then you must reboot your PDA! And only after you have rebooted your PDA with the SD card inside, you should ask haret to boot linux. That is very important because a linux kernel will not be loaded correctly (or it will but with only 10% chances) if one of the following conditions is true:
1. PDA has fallen asleep or suspended.
2. You have just inserted an SD card in your PDA and not rebooted it yet.
It looks like it is a bug in wince...

P.S. There you can download cupcake kernel http://source.android.com/download

P.P.S. When you build kernel with usbnet, don't set CONFIG_USB_ETH_RNDIS to 'y'! Or your PC kernel (2.6.x) will not find your PDA... neither cdc_ether nor cdc_subset will claim your PDA.

Saturday, February 28, 2009

Remove Solid Border

If you want to crop a picture stripping it from a border of some solid color, in linux you can use convert command which is a part of ImageMagick package:

convert original.jpg -trim modified.jpg

In a case you have a set of pictures, use find command to execute convert:
find *.jpg -exec convert {} -trim out/{} \;

Where out is a directory for converted images.

Monday, February 23, 2009

Extract Config from zImage

It was hard for me to find this simple thing in internet, so I gonna make life for someone a little bit easier.

If you want to extract config file from existing linux image, zImage or bzImage, do the following:
  • Download archive file with linux sources.
  • Unpack linux kernel sources
  • Go into root directory of the kernel sources
  • Run chmod 755 ./scripts/extract-ikconfig
  • Run ./scripts/extract-ikconfig /tmp/zImage > /tmp/config
Where /tmp/zImage is a file you want to extract a config from. And /tmp/config it is a filename for the extracted config.

Monday, May 19, 2008

OWFS 2.7p4

From OWFS site: OWFS is an easy way to use the powerful 1-wire system of Dallas/Maxim.

I've found a bug in OWFS 2.7p4. A badly written lock results in access to already freed memory region. In my case it usually shows itself in 1sec to 5 minutes of working in heavily simultaneous mode with many 1-wire devices. With this bugs OWFS ends up in a crash in a random place (usually tsearch complains about damaged list). GDB was not of much help here. But Valgrind (a really great tool) helped a lot.
==16965== Thread 9:
==16965== Invalid read of size 4
==16965== at 0x405F7A5: LockGet (ow_locks.c:142)
==16965== by 0x4066195: FS_r_given_bus (ow_read.c:229)
==16965== by 0x40663B2: FS_read_distribute (ow_read.c:191)
==16965== by 0x40668AD: FS_read_postparse (ow_read.c:106)
==16965== by 0x4066AEA: FS_read (ow_read.c:58)
==16965== by 0x409E26D: fuse_fs_read (in /usr/lib/libfuse.so.2.7.3)
==16965== by 0x40A2A12: (within /usr/lib/libfuse.so.2.7.3)
==16965== by 0x40A5F48: (within /usr/lib/libfuse.so.2.7.3)
==16965== by 0x40A6EAF: (within /usr/lib/libfuse.so.2.7.3)
==16965== by 0x40A86D5: fuse_session_process (in /usr/lib/libfuse.so.2.7.3)
==16965== by 0x40A4AD4: (within /usr/lib/libfuse.so.2.7.3)
==16965== by 0x40C8382: start_thread (in /lib/libpthread-2.7.so)
==16965== Address 0x43b8dc8 is 0 bytes inside a block of size 16 free'd
==16965== at 0x402465C: free (vg_replace_malloc.c:323)
==16965== by 0x41B281A: tdelete (in /lib/libc-2.7.so)
==16965== by 0x405F62B: LockRelease (ow_locks.c:164)
==16965== by 0x40662AD: FS_r_given_bus (ow_read.c:236)
==16965== by 0x40663B2: FS_read_distribute (ow_read.c:191)
==16965== by 0x40668AD: FS_read_postparse (ow_read.c:106)
==16965== by 0x4066AEA: FS_read (ow_read.c:58)
==16965== by 0x409E26D: fuse_fs_read (in /usr/lib/libfuse.so.2.7.3)
==16965== by 0x40A2A12: (within /usr/lib/libfuse.so.2.7.3)
==16965== by 0x40A5F48: (within /usr/lib/libfuse.so.2.7.3)
==16965== by 0x40A6EAF: (within /usr/lib/libfuse.so.2.7.3)
==16965== by 0x40A86D5: fuse_session_process (in /usr/lib/libfuse.so.2.7.3)

It has already been working for 2 hours, but I will wait a little bit more before send this patch to mailing list of OWFS.

Here is the patch.

P.S. Also Valgrind shows total memory leaks of 4kb.

(update 19 feb 2009: now it has been in work for nearly one year without any crash)

Monday, April 28, 2008

Java's Thread Priorities in Linux

As I told yesterday, Sun Java 5/6 has a "broken" priority policy for linux. There is a related bug in java's bugtracking system. So if to mention it briefly, there are two thread priority policies for linux. The first one, with code 0, specifies to ignore all thread priorities at all making all threads equal for linux scheduler. The second policy model, with code 1, maps java priorities to calls to the system setpriority function. By default java uses thread priority policy 0. You can say java to use policy 1 by invoking it with -XX:ThreadPriorityPolicy=1 command line argument. Unfortunately, this will work only if you start java with root privileges because the setpriority function sets nice level for processes and a process can't lower a nice level. This is a bad news. The good news is that Sun's java has another bug (I hope this bug will not be fixed). Look at the following code from the java 6 update 3 (build 105) sources (os_linux.cpp):
  if (ThreadPriorityPolicy == 1) {
// Only root can raise thread priority. Don't allow ThreadPriorityPolicy=1
// if effective uid is not root. Perhaps, a more elegant way of doing
// this is to test CAP_SYS_NICE capability, but that will require libcap.so
if (geteuid() != 0) {
if (!FLAG_IS_DEFAULT(ThreadPriorityPolicy)) {
warning("-XX:ThreadPriorityPolicy requires root privilege on Linux");
}
ThreadPriorityPolicy = 0;
}
}

It is meant to reset command line argument from 1 to 0 if the effective user is not root.

Look here:
OSReturn os::set_native_priority(Thread* thread, int newpri) {
if ( !UseThreadPriorities || ThreadPriorityPolicy == 0 ) return OS_OK;

int ret = setpriority(PRIO_PROCESS, thread->osthread()->thread_id(), newpri);
return (ret == 0) ? OS_OK : OS_ERR;
}

OSReturn os::get_native_priority(const Thread* const thread, int *priority_ptr) {
if ( !UseThreadPriorities || ThreadPriorityPolicy == 0 ) {
*priority_ptr = java_to_os_priority[NormPriority];
return OS_OK;
}
...
}

I've highlighted the interesting code. Do you see how it checks for policy? It means that if we set ThreadPriorityPolicy to ... say to 666, java will still work like the policy is set to 1. And the check that resets ThreadPriorityPolicy from 1 to 0 for non-root users will not be triggered. Whee! So in fact we can use the policy 1 for non-root users running java with the command line argument -XX:ThreadPriorityPolicy=666. But stop would say you, what will it give us if the system's setpriority function fails for non-root user? It gives us enough if we can run our lovely java initially with nice level -5. A level -5 is the nice level used for HIGHEST priority threads in java as you can see from the following code snippet:
int os::java_to_os_priority[MaxPriority + 1] = {
19, // 0 Entry should never be used

4, // 1 MinPriority
3, // 2
2, // 3

1, // 4
0, // 5 NormPriority
-1, // 6

-2, // 7
-3, // 8
-4, // 9 NearMaxPriority

-5 // 10 MaxPriority
};

Though this looks not fair and totally unholy, I think it is still better then running java with priorities ignored or under root. Thus you can run your java safely and well-scheduled with the command like this:
nice -n -5 su -c 'java -XX:ThreadPriorityPolicy=666 ThreadTester' akshaal

There is other way if you have no access to root user.
java -XX:ThreadPriorityPolicy=666 \
-XX:JavaPriority10_To_OSPriority=0 \
-XX:JavaPriority9_To_OSPriority=1 \
-XX:JavaPriority8_To_OSPriority=2 \
-XX:JavaPriority7_To_OSPriority=3 \
-XX:JavaPriority6_To_OSPriority=4 \
-XX:JavaPriority5_To_OSPriority=5 \
-XX:JavaPriority4_To_OSPriority=6 \
-XX:JavaPriority3_To_OSPriority=7 \
-XX:JavaPriority2_To_OSPriority=8 \
-XX:JavaPriority1_To_OSPriority=9 \
ThreadTester
The drawbacks of this method is that your normal priority threads will run with nice level 5 (although threads with the highest level will run with nice level 0 and lowest priority thread with nice level 9). That is it. Enjoy while these bugs (or features) are not fixed yet :).

Saturday, February 2, 2008

Debian + Eclipse + Java + AMD64

This is for those who use debian on amd64 with java from package . If you have a problem running eclipse (exit code=13 or alike) just install sun's java and enjoy! There is a something wrong with the java package in debian (sun-java6-*). I've spent two days trying get it to work.

Monday, June 4, 2007

Recent Upgrade of Debian (intel's video driver problem)

Yesterday I did apt-get dist-upgrade. ion3 as usually rejected to work properly for its API changes. I was not surprised and fixed this technically. But next, what I had noticed right after upgrade, was the large fonts in opposite to ones before upgrade. Quickly I discovered that DPI was incorrect due to a wrong display size. But it took me an enormous amout of time to fix. At first, I tried obvious DisplaySize declaration in a Monitor section of xorg.conf file, yet with no luck. Reading forums, I found one mentioning xrandr util that controls X's RandR extension that, in turn, responsible for DPI. I modified my ~/.xsession adding "xrandr --screen 0 --fbmm 300x225" as the first command. Most of the fonts became smaller, yet fonts of GTK remanined the same. And only today I found out why. I had been using GDM. GTK (GDM relied on it) loaded DPI values before an execution of ~/.xsession took place. So, I added xrandr command into /etc/gdm/Init/Default. It helped.

Next I discovered XV was not working now (no picture, just blue rectangle instead), becouse of bug in intel's driver. This bug exists in xserver-xorg-video-intel-2.0.0-1, and it has been definitely fixed in xserver-xorg-video-intel-2.0.0-3.

Saturday, May 26, 2007

Recovering of Encfs Password

Whew. I've found all forgotten passwords for encfs with a help of the perl script:


#!/usr/bin/perl

use strict;
use warnings;

# these words are used as password components
my @words = (
"example", " ", "word", "123", "666", "pwd", "part1"
);

my @l = ();

sub mindex {
my $x = shift;

for (my $i = 0; $i <= $#words; $i++) {
if ($words[$i] eq $x) {
return $i;
}
}

return -1;
};

sub inc {
my $p = shift;
my $v = $l[$p];

unless (defined $v) {
$l[$p] = $words[0];
} else {
my $i = mindex ($v);
if ($i == $#words) {
$l[$p] = $words[0];
inc ($p+1);
} else {
$l[$p] = $words[$i+1];
}
}
};

while (1) {
inc (0);
my @ll = reverse @l;
my $pwd = join '', @ll;

open F, ">/tmp/1233";
print F "pwd\n";
close F;

print "$pwd\n";
system "encfs -S /tmp/encfsdir /tmp/mountpoint < /tmp/1233";
}


You may use it if you still know a vague shape of password you have lost.

Wednesday, April 4, 2007

Dreambox

After two days of using I broke my dreambox 500 (receiver for sat tv). It loops on booting. I have no ideas how to repair it, so I've chosen it to reflash. It is flashing now. Linux rocks.

The following crap appears on boot:
[...]
Multiplex thread got Data
Command='ZAP'
Zap data ,
Multiplex thread got Data
Dropping connection
active count=0
rc=0 '0,'
------------> changed! 0
no transponder 1 444
[TUNE] tune failed
Segmentation fault

Sunday, March 25, 2007

mmc

I've made a patch for MMC (mud client). With this patch, mmc supports 256 color space of xterm/rxvt/putty/..., broken terminals (no more "terminal cannot insert/delete characters") and keypad characters. Screenshort.

Tuesday, March 13, 2007

OSD Desktop

Yet Another Long Deferred (for years) Post. At last I've recorded how a working upon my desktop looks like (640x480 10fps 2mb or 1024x768 10fps 6mb). The idea concerning osd'ish desktop had floated around for long, before I sat and wrote first lines of code. Due to a logical evolution of my desktop I had gotten used to work with any application in fullscreen mode. Things like clocks, bars and meters had quickly been rid from my desktop. Although I found myself in a world without notifications. I was happy. Then, OSD came to me as a solution to keep fullscreenness and be aware of events. Using python and osd library for it, I've implemented an events daemon. The daemon reads lines from the ~/log/events file and parses them using one of the following patterns:
  • string - add this string into a list of displaying strings.
  • [][][]\d\d\d\d: string - the same as previous case, but the string is visible for the \d\d\d\d (four digits) ms.
  • \d\d\:\d\d:\d\d: string - the same as first case, but with a date preceeding string. The date is not visible on OSD.
  • \d\d\:\d\d:\d\d: [][][]\d\d\d\d: string - The same as second case with the mark as in third case.
    Now it was a time to implement programs that would write to the ~/log/events file. First such program became aktimelog that writes time into the events log every 25 minutes. Others I've made: plugin for irssi to see either public, private or both messages, monitoring of keyboard layout changes, workspace switching, mail notifications, shell notifications. Also it is not needless to say that workspace switching is driven by shortcuts. For instance, if you press the MOD-e shortcut, in addition to switching workspace, ion3 checks whether emacs is runned and run it if it is not yet and you confirmed it for. I usually know where I have to switch to, and don't waste my time running through the list of open programs. So MOD-e is for emacs, MOD-p -- revelation, MOD-c -- eclipse, MOD-b -- browser, MOD-1 -- first terminal, MOD-2 -- second terminal... and so on. That is how my desktop works. But how does yours work? :)

    Sources.
  •