Saturday, March 8, 2014

Setting up direct access to a block device from VM in Xen XCP (Debian 7.4 (wheezy))

There is no good documentation for XCP at the moment. Amount of documentation for such a complicated project is close to nothing when it comes to XCP on Debian (project Kronos). Citrix XenServer has a better support but I don't use XenServer, I use Debian. Therefore almost any simple task starts with "hours" of search in internet.
Normally you don't need direct access to a block device from a virtual machine, but in some cases it is very to convenient to use one. One of such cases is a file/backup server which needs access to a raid or just a huge hard disk with an existing file system.
Here is what should be done in order to make it work.
1. Create a directory which will contain links to the block devices visible in XEN.
mkdir /srv/xen-devices

2. Create storage repository for the block devices
xe sr-create name-label="Block devices" name-description="Block devices which we want to use directly in XEN" type=udev content-type=disk device-config:location=/srv/xen-devices
assign displayed uuid to shell variable SR

3. [Optional] If step 2 fails with the error message:
The SR could not be connected because the driver was not recognised.
driver: udev

then you need to fix it. Do the following:
cd /usr/lib/xcp/sm/
ln -s udevSR.py udevSR
/usr/lib/xcp/bin/xe-toolstack-restart
And then try again step 2.

4. Find a device you want to make visible in the Xen, for example, like this:
ls -l /dev/disk/by-path

Link it
ln -s /dev/disk/by-id/ata-some-device /srv/xen-devices/some-device

5. Rescan our storage repository
xe sr-scan uuid=$SR

6. List VDIs of the storage repository and spot the one with "Unrecognised bus type"
xe vdi-list sr-uuid=$SR

assign VDI¨s uuid to the VDI variable in shell.

7. Set name and label for the VDI to whatever you like:
xe vdi-param-set uuid=$VDI name-description="A real disk" 
xe vdi-param-set uuid=$VDI name-label="R-disk"

8. Create VBD which assign the VDI to the VM
xe vbd-create device=1 vm-uuid=$VM vdi-uuid=$VDI bootable=false mode=RW type=Disk
assign display uuid to the VBD variable

9. Attach it to the VM
xe vbd-plug uuid=$VBD

That's all. Now you can log into the virtual machine and check with 'dmesg' that a new device is available.


Tuesday, September 11, 2012

Full (de)serialization for Play Json using general purpose macros

I've released a new version of akmacros library for Scala 2.10. The release includes a new macro called 'factory'. Thanks to the new macro it is possible to construct a class with a public default constructor just passing a function to the generated factory of the class. The function receives symbol of an argument of the constructor and returns value for this argument. If function returns None, then default value for the argument is evaluated (provided that it is defined for the given argument). Here is the example:
    scala> import info.akshaal.clazz._
    import info.akshaal.clazz._

    scala> case class Record (name: String, twitter: Option[String] = None)
    defined class Record

    scala> val recordFactory = factory[Any, Record]('castValue)
    recordFactory: (Symbol => Option[Any]) => Record = <function1>

    scala> val args = Map('name -> "Evgeny")
    args: scala.collection.immutable.Map[Symbol,String] = Map('name -> Evgeny)

    scala> recordFactory(args.get)
    res0: Record = Record(Evgeny,None)

Writing less boilerplate code for Play Json

Just to demonstrate the way macro functions can simplify your code I've created a small project on github. The project includes Json library from the Play2.0 framework mostly as-is. The only changes I did are related to making it work on scala 2.10 (upgraded it to patched jerkson and so on). You might be interested in this file. It is the only file that I implemented in that project in order to add support for macros to the Play Json. Following the same pattern, you can easily use almost any other Json library like this.

Lets look what it gives you without any reflections.. Lets start with something simple:
    scala> import info.akshaal.json.play._
    import info.akshaal.json.play._

    scala> import play.api.libs.json._
    import play.api.libs.json._

    scala> case class Simple(str: String, num: Int = new Random().nextInt())
    defined class Simple

    scala> implicit val simpleJsFactory = factory[Simple]('fromJson)
    simpleJsFactory: (Symbol => Option[play.api.libs.json.JsValue]) => Simple = <function1>

    scala> implicit val simpleJsFields = allFields[Simple]('jsonate)
    simpleJsFields: List[info.akshaal.clazz.Field[Simple,play.api.libs.json.JsValue,None.type]] = List(Field(str,<function1>,None), Field(num,<function1>,None))
We can serialize and then deserialize:
    scala> val obj = new Simple("123", 5)
    obj: Simple = Simple(123,5)

    scala> val objJs = Json.toJson(obj)
    objJs: play.api.libs.json.JsValue = {"str":"123","num":5}

    scala> val obj2 = Json.fromJson[Simple](objJs)
    obj2: Simple = Simple(123,5)
That was easy. Now lets try to leverage default value feature of the case class:
    scala> val halfObjJs = Json.parse(""" {"str":"test"} """)
    halfObjJs: play.api.libs.json.JsValue = {"str":"test"}

    scala> val halfObj = Json.fromJson[Simple](halfObjJs)
    halfObj: Simple = Simple(test,-813663852)

    scala> val halfObj = Json.fromJson[Simple](halfObjJs)
    halfObj: Simple = Simple(test,-948806581)

    scala> val halfObj = Json.fromJson[Simple](halfObjJs)
    halfObj: Simple = Simple(test,428745442)
Note that we parsed halfObjJs three times. And 'num' was always different. That is because value for 'num' is missing in the halfObjJs and so the expression for default value was used (which is Random().nextInt, see defintion of Simple class). How about parametrized classes? Lets try:
    scala> case class Event[T](kind: String, payloads: T)
    defined class Event

    scala> implicit def eventJsFields[T: Writes] = allFields[Event[T]]('jsonate)
    eventJsFields: [T](implicit evidence$1: play.api.libs.json.Writes[T])List[info.akshaal.clazz.Field[Event[T],play.api.libs.json.JsValue,None.type]]

    scala> implicit def eventJsFactory[T: Reads] = factory[Event[T]]('fromJson)
    eventJsFactory: [T](implicit evidence$1: play.api.libs.json.Reads[T])(Symbol => Option[play.api.libs.json.JsValue]) => Event[T]
And test:
    scala> val event = Event(kind = "strange", payloads = obj)
    event: Event[Simple] = Event(strange,Simple(123,5))

    scala> val eventJs = Json.toJson(event)
    eventJs: play.api.libs.json.JsValue = {"kind":"strange","payloads":{"str":"123","num":5}}

    scala> val event3 = Json.fromJson[Event[Simple]](eventJs)
    event3: Event[Simple] = Event(strange,Simple(123,5))
In the real world it is unlikely that you will use completely unrestricted types (like T in the example above) in your case classes with json. It is more likely that there will be a (sealed) trait and some set of its subtypes. Lets see how it works. First, we will define some more case classes:
    sealed trait Message
    case class QuitMessage(msg: String) extends Message
    case class Heartbeat(id: Int) extends Message

    case class Messages(userId: Int, messages: List[Message] = List.empty)
Now, lets define how to serialize our new case classes:
    implicit def messageWrites = matchingWrites[Message] {
        case m: QuitMessage => quitMessageJsFields.toWrites.writes(m)
        case m: Heartbeat   => heartbeatJsFields.toWrites.writes(m)
    }

    implicit def quitMessageJsFields = allFields[QuitMessage]('jsonate)
    implicit def heartbeatJsFields = allFields[Heartbeat]('jsonate)
    implicit def messagesJsFields = allFields[Messages]('jsonate)
And if deserialization is needed, lets define how to do it:
    implicit def quitMessageJsFactory = factory[QuitMessage]('fromJson)
    implicit def heartbeatJsFactory = factory[Heartbeat]('fromJson)
    implicit def messagesJsFactory = factory[Messages]('fromJson)

    implicit def messageReads: Reads[Message] =
        predicatedReads[Message](
            jsHas('msg) -> quitMessageJsFactory,
            jsHas('id) -> heartbeatJsFactory
        )
Finally, lets try it:
    scala> val event5 =
              Event(kind = "t1",
                    payloads = Messages(userId = 4, messages = List(Heartbeat(5), QuitMessage("bye!"))))
    event5: Event[Messages] = Event(t1,Messages(4,List(Heartbeat(5), QuitMessage(bye!))))

    scala> val event5Js = Json.toJson(event5)
    event5Js: play.api.libs.json.JsValue = {"kind":"t1","payloads":{"userId":4,"messages":[{"id":5},{"msg":"bye!"}]}}
Pay attention, that Json for QuitMessage and Heartbeat classes has no type information or anything! It's just plain json with domain fields only. That's why messageReads has those jsHas occurances in its implementation, that is a little help for identifying which json object is what subtype of Message. Lets see that reading from json still works:
    scala> val event6 = Json.fromJson[Event[Messages]](event5Js)
    even6: Event[Messages] = Event(t1,Messages(4,List(Heartbeat(5), QuitMessage(bye!))))
Actually there is another way to do the same. You can inject an extra field into json object when serializing one of subtypes of an abstract type and use it as a guidance for reconstructing objects from json. It is really easy. Lets modify messageReads and messageWrites like this:
    implicit def messageWrites = matchingWrites[Message] {
        case m: QuitMessage => quitMessageJsFields.extra('type -> 'quit).toWrites.writes(m)
        case m: Heartbeat   => heartbeatJsFields.extra('type -> 'heart).toWrites.writes(m)
    }

    implicit def messageReads: Reads[Message] =
        predicatedReads[Message](
            jsHas('type -> 'quit)  -> quitMessageJsFactory,
            jsHas('type -> 'heart) -> heartbeatJsFactory
        )
Now we test the new implementation.
    scala> val messages = List(Heartbeat(1), QuitMessage("Hello"), Heartbeat(99))
    messages: List[Product with Serializable with Message] = List(Heartbeat(1), QuitMessage(Hello), Heartbeat(99))

    scala> val messagesJs = Json.toJson(messages)
    messagesJs: play.api.libs.json.JsValue = [{"type":"heart","id":1},{"type":"quit","msg":"Hello"},{"type":"heart","id":99}]

    scala> val messages2 = Json.fromJson[List[Message]](messagesJs)
    messages2: List[Message] = List(Heartbeat(1), QuitMessage(Hello), Heartbeat(99))
That's not all. What if there is an information in a case class you don't want to reveal in JSON? Consider the following case class. I will annotate fields that are safe to export by Ok annotation:
    @annotation.meta.getter
    class Ok extends annotation.StaticAnnotation

    case class User(@Ok login: String,
                    @Ok fullName: String,
                    @Ok messages: Int = 0,
                    passwordHash: Option[String] = None)
Now it's quite natural to define json fields like this:
    implicit val userJsFields = annotatedFields[User, Ok]('jsonate)
Let see it in action:
    scala>
    |       val user = User(login = "akshaal",
    |                       fullName = "Evgeny Chukreev",
    |                       messages = 10,
    |                       passwordHash = Some("4d18758602c08243d7c08f8c9e4463b0"))
    user: User = User(akshaal,Evgeny Chukreev,10,Some(4d18758602c08243d7c08f8c9e4463b0))

    scala> val userJs = Json.toJson(user)
    userJs: play.api.libs.json.JsValue = {"login":"akshaal","fullName":"Evgeny Chukreev","messages":10}
It works.. But you can do more. Recall (if you looked at the implementation) that jsonate function was defined like this:
    def jsonate[T: Writes](t: T, args: Any): JsValue = Json.toJson(t)
The function is used to make a json value out of field's value. It is applied to each field. So you can define your our function that does post-processing (pre-processing?) and use it with a macro. The second argument (args) might be a parameter set given to annotation, this gives you even more power for writing complex json serialization easily.

And not only JSON. Using the same approach you can (de)serialize object from/to XML...

Pros of akmacros-json

  • Domain classes are separated from any notion of JSON
  • Full control over serialization/deserialization
  • Easy to use
  • Easy to extend or implement your own
  • No runtime reflections used

Cons of akmacros-json

  • Depends on Jerkson which is officially unavailable for Scala 2.10 (you need to build it from my fork (in order to build it you will need also this forked project))
  • Includes a copy of Play Json
  • Scala 2.10-M7 has many bugs related to implicits, value classes... so implementation as you might have noticed is not perfect in terms of performance (defs are used instead of vals)
I hope things will change really soon with the release of Scala 2.10.

About general purpose macros

This tiny macros addition is built on top of Play JSON (which is built on top of Jerkson (which is built on top of Jackson)) and akmacros (which doesn't have dependencies). Checkout 78 lines long implementation here. See https://github.com/akshaal/akmacros for a bit more information about using akmacros with sbt.

Wednesday, September 5, 2012

Easily implementing Json serialization for Play using macro. Function by symbol (lisp-like)l

I liked the idea of using fields macro in scala so much so I created a dedicated project for this macro to start reusing it in the different projects I did. Here it is.

Few words about implementation of this macro

The code has been reworked and now it is possible to transform field value using a supplied function. It means that Field and Fields types, and fields macro signatures are changed. In addition, there is a new convenient macro called allFields. I.e.:
    case class Field[-I <: AnyRef, +R, +A <: Product](name: String, get: I => R, args: A)
    type Fields[-I <: AnyRef, +R, +A <: Product] = List[Field[I, R, A]]
    def fields[Ann, I <: AnyRef, R, Args <: Product](apply: Symbol) = macro fieldsImpl[Ann, I, R, Args]
    def allFields[I <: AnyRef, R](apply: Symbol) = macro fieldsImpl[Any, I, R, None.type]
allFields is the new function that lists all public value members enclosed in the given type regardless of annotations. R in a Field(s) type stands for RETURN and represents type of a value returned by the field getter transformed using the supplied function. Value transformer function is passed into the macro using its symbol. You might wonder why aren't we just using something like f : T => R forSome { type T } ? That's because you can't pass the following function that way:
    def trans[T : TypeClass](x : T) : Int = ???
(which is just a sweet way of saving some keystrokes by not writing this:)
    def trans[T](x : T)(implicit tc : TypeClass[T]) : Int = ???
i.e. you can't pass function with TWO parameters (one of which is implicit parameter) where a ONE parameter function is expected. That is quite obvious but anyway.. So we use Symbol (in the spirit of Lisp). As you might guess by looking at the snippet below, it is expected that the symbol is constructed directly and not passed by reference:
        val applyFunName =
            apply.tree match {
                case Apply(_, List(Literal(Constant(s)))) => s.toString
                case _ =>
                    c.abort(apply.tree.pos,
                        "fields macro is expected to be used with symbol literal like 'nothing or 'myFunction")
            }
Almost everything in the macro implementation remains more-less same, except part that constructs expression for getting field value out of object. Now it looks like this:
                val applyFunTree = c.parse(applyFunName)
                val getFunArgTree = ValDef(Modifiers(), newTermName("x"), TypeTree(instanceT), EmptyTree)
                
                val getFunBodyTree =
                    treeBuild.mkMethodCall(applyFunTree,
                        List(Select(Ident(newTermName("x")), newTermName(name)),
                             argsTree))
getFunBodyTree illustrates what signature is really expected for the transformer function: in addition to field value, all arguments of the annotation are passed into the function (or None if no annotation used or annotation has no arguments). For example, you can't use Predef.identity function, instead, you should use valueIdentity which is (already) defined like this:
def valueIdentity[X] (value : X, annotationArgs : Any) : X = value
Having annotation arguments provided for the currently processing field gives you possibility for further customization of how the value is transformed. Now lets do an example.

Real-world example

Suppose you want to serialize your custom classes into JSON with no boilerplate code what so ever. That is how you can do it with this only (general-purpose) macro. Lets define some generic Writes typeclase provider:
    implicit def writesForFields[T <: AnyRef](implicit fields: clazz.Fields[T, JsValue, _]): Writes[T] = {
        new Writes[T] {
            def writes(t: T): JsValue = {
                JsObject(fields map {
                    (field: clazz.Field[T, JsValue, _]) =>
                        field.name -> field.get(t: T)
                })
            }
        }
    }
The function shown above implicitly creates Writes for any type T which has an implicit instance of type Fields[T, JsValue, _] (read it like "List of fields of class T along with function to get value of type JsValue for each field"). Now lets define the transformer function, it will be used for serialization of field values:
def asJsValue[T : Writes](v : T, annArgs : Any) : JsValue = Json.toJson(v)
That was the only code needed to bootstrap your mini-serialization framework. Now you can use it. Lets assume you have declarations:
    case class JquerySocketEvent[T](id: Int, data: T, `type`: String = "message", reply: Boolean = false)
    case class ChatMessage(user: String, text: String)
    
    implicit def jquerySocketEventJsFields[T: Writes] = clazz.allFields[JquerySocketEvent[T], JsValue]('asJsValue)
    implicit val chatMessageJsFields = clazz.allFields[ChatMessage, JsValue]('asJsValue)
That's it. ... some fun:
        val event = JquerySocketEvent(id = 1, data = ChatMessage("Fluttershy", "Yay!"))
        println (Json.toJson(event))
... prints:
    {"id":1,"data":{"user":"Fluttershy","text":"Yay!"},"type":"message","reply":false}
That was easy enough. Feel free to use it, re-implement it or implement a more powerful stuff. Macros FTW!

Saturday, August 25, 2012

Kiama & macro

Here is a quick and dirty example of using kiama along with the fields macro.
import annotated.{ Field => AnnField, Fields => AnnFields }

object pp {
    private object kpp extends org.kiama.output.PrettyPrinter
    import kpp._

    private def anyToDoc(any : Any) : Doc =
        any match {
            case song : Song        => annotatedToDoc("Song", song, songFields)
            case artist : Artist    => annotatedToDoc("Artist", artist, artistFields)
            case comp : Compilation => annotatedToDoc("Compilation", comp, compilationFields)
            case job : UploaderJob  => annotatedToDoc("Job", job, uploaderJobFields)

            case map : Map[_, _] =>
                list(map.iterator.toList,
                    prefix = "Map",
                    elemToDoc = {
                        (pair : (Any, Any)) =>
                            anyToDoc(pair._1) <> " -> " <> nest(anyToDoc(pair._2))
                    })

            case seq : Seq[_] =>
                list(seq.toList, prefix = "Sequence", elemToDoc = anyToDoc)

            case _ => value(any)
        }

    private def annotatedToDoc[T <: AnyRef](name : String, t : T, fields : AnnFields[T, FieldArgs]) : Doc = {
        list(fields,
            prefix = name,
            elemToDoc = {
                (f : AnnField[T, FieldArgs]) =>
                    f.name <> " = " <> anyToDoc(f.get(t))
            })
    }

    def apply(any : Any) : String = pretty(anyToDoc(any))
}
pp (uploaderJob) easily prints data like this:
Job(
    artistMap = Map(
        KeyRef(1x) -> Artist(
                handle = Tester2,
                marks = Set(),
                id = None,
                name = None,
                website = None,
                country = None,
                location = None),
        KeyRef(2u) -> Artist(
                handle = Tester,
                marks = Set(),
                id = None,
                name = None,
                website = None,
                country = None,
                location = None)),
    songMap = Map(
        KeyRef(6t) -> Song(
                relativePath = Path(test7.mp3),
                title = test7,
                artistRefs = Set(KeyRef(2u)),
                tags = Set(),
                id = None,
                sourceId = None,
                mixSongId = None,
                year = Some(1999)),
        KeyRef(5c) -> Song(
                relativePath = Path(test6.mp3),
                title = test6,
                artistRefs = Set(KeyRef(2u)),
                tags = Set(),
                id = None,
                sourceId = None,
                mixSongId = None,
                year = Some(1999)),
        KeyRef(9i) -> Song(
                relativePath = Path(test3.mp3),
                title = test3,
                artistRefs = Set(KeyRef(1x)),
                tags = Set(),
                id = None,
                sourceId = Some(4),
                mixSongId = None,
                year = None),
        KeyRef(3w) -> Song(
                relativePath = Path(test5.mp3),
                title = test5,
                artistRefs = Set(KeyRef(2u)),
                tags = Set(),
                id = None,
                sourceId = None,
                mixSongId = None,
                year = Some(1999)),
        KeyRef(7l) -> Song(
                relativePath = Path(test.mp3),
                title = test,
                artistRefs = Set(),
                tags = Set(),
                id = None,
                sourceId = None,
                mixSongId = None,
                year = None),
        KeyRef(8f) -> Song(
                relativePath = Path(test2.mp3),
                title = test2,
                artistRefs = Set(),
                tags = Set(),
                id = None,
                sourceId = None,
                mixSongId = None,
                year = None),
        KeyRef(4p) -> Song(
                relativePath = Path(test4.mp3),
                title = test4,
                artistRefs = Set(KeyRef(2u)),
                tags = Set(),
                id = None,
                sourceId = None,
                mixSongId = None,
                year = Some(1999)),
    compilationMap = Map(
        KeyRef(11x) -> Compilation(
                title = Compo,
                songRefs = Sequence(KeyRef(6t)),
                marks = Set(),
                year = Some(1999),
                cdOrSide = Some(B)),
        KeyRef(10g) -> Compilation(
                title = Compo,
                songRefs = Sequence(KeyRef(3w), KeyRef(4p), KeyRef(5c)),
                marks = Set(),
                year = Some(1999),
                cdOrSide = Some(A))))

Saturday, August 18, 2012

Scala 2.10: annotated fields macro

Here is a short example of how one can leverage SIP-16 introduced in Scala-2.10.
(The source code you will find below is expected to be compiled on Scala 2.10-M7. Note, that -M6 provides a slightly different set of API for macro.)

Lets define a macro that makes it possible to traverse value fields of a (case) class. First, we import what we will use:
import language.experimental.macros
import scala.reflect.macros.Context
import scala.annotation.Annotation
The macros, we are implementing, will be located in 'annotated' object since Scala allows usage of type aliases inside object (unlike package namespace).
object annotated {
Any field belongs to a class (denoted as I). An annotated field might have useful information given by arguments on annotation. Type of the annotation arguments is denoted as A. Here is the definition of the Field class:
    /**
     * An object of this class represents an annotated field.
     * @tparam I type of class the field belongs to
     * @tparam A type of annotation arguments (TupleX or None)
     * @param name name of the field
     * @param get function that returns field value of an instance given as argument to the function
     * @param args list of arguments to the annotation found on the field
     */
    case class Field[I <: AnyRef, A <: Product](name : String, get : I => Any, args : A)
Here is the type alias to save some typing:
    /**
     * List of fields belonging to the given type.
     * @tparam I Owner of fields
     * @tparam A type of annotation arguments (TupleX or None)
     */
    type Fields[I <: AnyRef, A <: Product] = List[Field[I, A]]
That is how our macro is supposed to be seen by developers (i.e. it is supposed to be seen as an ordinary function):
    /**
     * Macro which inspects class 'I' and returns a list of fields annotated with annotation 'Ann'.
     * @tparam Ann search for field with this annotation
     * @tparam Args type of arguments in the annotation (TupleX or None)
     * @tparam I type of class to scan for annotated fields
     */
    def fields[Ann <: Annotation, Args <: Product, I <: AnyRef] = macro fieldsImpl[Ann, Args, I]
Finally, here is the implementation of the macro itself. The implementation is called by the scala compiler whenever it sees 'fields' macro:
    /**
     * Implementation of the fields macro.
     */
    def fieldsImpl[AnnTT <: Annotation : c.AbsTypeTag,
                   Args <: Product : c.AbsTypeTag,
                   ITT <: AnyRef : c.AbsTypeTag](c : Context) : c.Expr[Fields[ITT, Args]] = {
("Args <: Product : c.AbsTypeTag" means "type Args is a subtype of type Product and there is an implicit value of type c.AbsTypeTag[Args]")
Note that here and further below we use types (like AbsTypeTag) which are from the context 'c'. That is a compilation context of the application which the scala compiler will construct for the source code where the macro invocation is faced (not exactly but..).

Now lets import types and values (like Select, Ident, newTermName) from the universe of the application the macro is currently used in:
        import c.universe._
Lets materialize some types as objects for further manipulation:
        val instanceT = implicitly[c.AbsTypeTag[ITT]].tpe
        val annT = implicitly[c.AbsTypeTag[AnnTT]].tpe
Now, some real action: get annotated fields. Note that hasAnnotation doesn't work for a reason I don't know...
        val annSymbol = annT.typeSymbol
        val fields = instanceT.members filter (member => member.getAnnotations.exists(_.atp == annT))
It is convenient to have a helper function. This function will fold given expression sequence into a new expression that creates List of expressions at runtime ;-)
        def foldIntoListExpr[T : c.AbsTypeTag](exprs : Iterable[c.Expr[T]]) : c.Expr[List[T]] =
            exprs.foldLeft(reify { Nil : List[T] }) {
                (accumExpr, expr) =>
                    reify { expr.splice :: accumExpr.splice }
            }
For each field, construct expression that will instantiate Field object at runtime:
        val fieldExprs =
            for (field <- fields) yield {
                val argTrees = field.getAnnotations.find(_.atp == annT).get.args
                val name = field.name.toString.trim // Why is there a space at the end of field name?!
                val nameExpr = c literal name

                // Construct arguments list expression
                val argsExpr =
                    if (argTrees.isEmpty) {
                        c.Expr [Args] (Select(Ident(newTermName("scala")), newTermName("None")))
                    } else {
                        val tupleConstTree = Select(Select(Ident(newTermName ("scala")),
                                                           newTermName(s"Tuple${argTrees.size}")),
                                                    newTermName("apply"))
                        c.Expr [Args] (Apply (tupleConstTree, argTrees))
                    }
                    
                // Construct expression (x : $I) => x.$name
                val getFunArgTree = ValDef(Modifiers(), newTermName("x"), TypeTree(instanceT), EmptyTree)
                val getFunBodyTree = Select(Ident(newTermName("x")), newTermName(name))
                val getFunExpr = c.Expr[ITT => Any](Function(List(getFunArgTree), getFunBodyTree))
                
                reify {
                    Field[ITT, Args](name = nameExpr.splice, get = getFunExpr.splice, args = argsExpr.splice)
                }
            }
By this moment, value fieldExprs will contain something like
List (
   reify {Field ('field1', (x => x.field1), (..)},
   reify {Field ('field2', (x => x.field2), (..)}
)
(where (..) are arguments of annotaiton on that field)
Now we have to lift List construction into expression and we're done!
       // Construct expression list like field1 :: field2 :: Field3 ... :: Nil
        foldIntoListExpr(fieldExprs)
    }
}

And finally lets have some fun. Lets test it in REPL! (beware that scala macros are supposed to be compiled before they are used)
scala> type FormatFun = Any => Any
defined type alias FormatFun

scala> type PrettyArgs = (Option[String], FormatFun)
defined type alias PrettyArgs

scala> class Pretty(aka : Option[String] = None, format : FormatFun = identity) extends annotation.StaticAnnotation
defined class Pretty
scala> :paste
// Entering paste mode (ctrl-D to finish)

def pp[X <: AnyRef](fields : annotated.Fields[X, PrettyArgs])(x : X) = {
    fields map {
        case annotated.Field(fieldName, get, (akaOpt, fmtFun)) =>
            val name = fieldName.replaceAll("([A-Z][a-z]+)", " $1").toLowerCase.capitalize
            val aka = akaOpt map (" (aka " + _ + ")") getOrElse ""
            val value = fmtFun(get(x))
            s"$name$aka: $value"
    } mkString "\n"
}
        
// Exiting paste mode, now interpreting.

pp: [X <: AnyRef](fields: info.akshaal.radio.uploader.annotated.Fields[X,(Option[String], Any => Any)])(x: X)String

Still no macro was used. Now here it comes. First, we define case class. Next, we gather annotated fields in the definition of personPrettyFields. When you run it in REPL, it is quite important to use :paste, otherwise annotation of the case class will be lost because subtypes of StaticAnnotation are visible during compilation only (REPL calls a new scala compiler for each expression reusing binary classes compiled during previous steps). So:
scala> :paste
// Entering paste mode (ctrl-D to finish)

case class Person(
    id : Int,
    @Pretty(aka = Some("nickname")) name : String,
    @Pretty firstName : String,
    @Pretty(None, format = _.toString.toUpperCase) secondName : String,
    @Pretty(None, format = { case x : Option[_] => x getOrElse "" }) twitter : Option[String])
val personPrettyFields = annotated.fields[Pretty, PrettyArgs, Person]
        
// Exiting paste mode, now interpreting.

defined class Person
personPrettyFields: List[info.akshaal.radio.uploader.annotated.Field[Person,(Option[String], Any => Any)]] =
    List(Field(name,<function1>,(Some(nickname),<function1>)),
         Field(firstName,<function1>,(None,<function1>)),
         Field(secondName,<function1>,(None,<function1>)),
         Field(twitter,<function1>,(None,<function1>)))
(I've aligned the output of REPL a bit..)
Lets check field names:
scala> personPrettyFields map (field => field.name)
res0: List[String] = List(name, firstName, secondName, twitter)
Here are getters of each field:
scala> personPrettyFields map (_.get)
res1: List[Person => Any] = List(<function1>, <function1>, <function1>, <function1>)
Now, lets create a Person object:
scala> val person1 = Person(1, "akshaal", "Evgeny", "Chukreev", Some("https://twitter.com/Akshaal"))
person1: Person = Person(1,akshaal,Evgeny,Chukreev,Some(https://twitter.com/Akshaal))
... and a value for each field of this person:
scala> personPrettyFields map (_.get (person1))
res2: List[Any] = List(akshaal, Evgeny, Chukreev, Some(https://twitter.com/Akshaal))
Some more objects for more fun:
scala> val person2 = Person(2, "BillGates", "Bill", "Gates", Some("https://twitter.com/BillGates"))
person2: Person = Person(2,BillGates,Bill,Gates,Some(https://twitter.com/BillGates))

scala> val persons = List(person1, person2)
persons: List[Person] =
    List(Person(1,akshaal,Evgeny,Chukreev,Some(https://twitter.com/Akshaal)),
         Person(2,BillGates,Bill,Gates,Some(https://twitter.com/BillGates)))

scala> val ppPerson = pp(personPrettyFields) _
ppPerson: Person => String = <function1>         
And finally:
scala> persons map ppPerson mkString "\n----------------------------\n"
res5: String =

Name (aka nickname): akshaal
First name: Evgeny
Second name: CHUKREEV
Twitter: https://twitter.com/Akshaal
----------------------------
Name (aka nickname): BillGates
First name: Bill
Second name: GATES
Twitter: https://twitter.com/BillGates

That's all ;-) You will find complete source code along with specs2 specification (with one more example) on the gist: https://gist.github.com/3388753

No animals were killed.

No types were casted.

No reflections were used.

Wednesday, January 20, 2010

nut & ippon

It was tricky to make nut 2.4.1 work with IPPON Power PRO 1000 using USB interface.

Any driver (blazer_usb, megatec_usb) failed with the message:
Can't claim USB device [xxxx:yyyy]: could not detach kernel driver from interface 0: Operation not permitted

It turned out, that nut came with the broken configuration for udev 150 (on debian). To fix the problem, I commented out all lines in /etc/udev/rules.d/52-nut-usbups.rules, and created a new file with the name /etc/udev/rules.d/46-ippon.rules and the following content:

SUBSYSTEM=="usb", ATTR{idVendor}=="0665", ATTR{idProduct}=="5161", MODE="0664", GROUP="nut"

This helped. Required product id and vendor id are discovered from the output of lsusb program.

PS. The following alias is very useful when configuring something with udev:
alias udevinfo="udevadm info -a -n"
and it can be used like:
udevinfo /dev/sda

Thursday, November 26, 2009

Upgrade of Firefox

After apt-get dist-upgrade I got this "Could not initialize the browser's security component. The most likely cause is problems with files in your browser's profile directory. Please check that this directory has no read/write restrictions and your hard disk is not full or close to full. It is recommended that you exit the browser and fix the problem. If you continue to use this browser session, you might see incorrect browser behavior when accessing security features."

I tried many possible solutions discovered in internet, but the only thing helped was removing of secmod.db file from my profile directory of firefox. I have no idea what this file is for, but it works. If you are having the same problem, backup your ~/.mozilla directory first before trying this or other solution which involves removing of files.

Friday, October 2, 2009

Auto-mount with halevt

halevt is good piece of software but by default it mounts disks in a way very inconvenient for me - that is mount points are like '/media/disk' '/media/disk-1/ '/media/disk-2' and so on. In order to help myself find disks more easily I've reconfigured halevt and created a script. Now I have /media/Cruzer-d4ba-1 and /media/Cruzer-a5e1-1 mountpoints for my two Sandisk USB sticks. And there are SD_Reader-a6a1-1, SD_Reader-a6a1-2, SD_Reader-a6a1-3 (three partitions) for the SD card I've inserted into a reader. A mountpoint name is composed by concatenating storage model name, short version of storage serial id and partition number. This is done by the following script (~/bin/halevt-mount-helper):
#!/bin/sh

STORAGE=`hal-get-property --udi "$1" --key block.storage_device`
PARTITION=`hal-get-property --udi "$1" --key volume.partition.number`
UUID=`hal-get-property --udi "$STORAGE" --key storage.serial | md5sum | head -c 4`
MODEL=`hal-get-property --udi "$STORAGE" --key storage.model | sed 's/ /_/g' | sed 's/^USB_//g'`

MPOINT="$MODEL-$UUID-$PARTITION"

halevt-mount -u "$1" -p "$MPOINT" -o sync -m 007
The script is used by configuring halevt with the following line instead of the default "halevt:insertion" line in halevt configuration file (/etc/halevt/halevt.xml or ~/.halevt/halevt.xml):
   <halevt:insertion exec="halevt-mount-helper $hal.udi$">

More security with ZSH

Don't save commands in history while a secure device is mounted. The mounted device must have .secure file in order to disable history file while the device mounted.

zshaddhistory() {
DIRS=`cat /proc/mounts | rgrep -P '(fuse|ext3|ext2|ext4|fat)' | cut -f2 -d' '`
FLAG=`for dir in ${=DIRS} ; do test -f "$dir/.secure" && echo secure; done`
echo $FLAG | grep secure 2>/dev/null >/dev/null && return -1 || return 0
}

Saturday, August 22, 2009

Constructor annotation in Scala 2.8.0

It was really hard for me to find any information concerning annotations on default constractor. Finally I discovered that scala accepts the following syntax:
class MyClass @Annotation() (val arg : Int) {
}

It is important that an annotation is followed by (), otherwise parameters of MyClass are parsed as parameters of annotation...

Tuesday, August 18, 2009

Richfaces & JSF 1.2

The problem with Richfaces 3.3.1 and Sun JSF RI is that an exception thrown in action listener is suppressed by Richfaces. I will show why this happens. The following stacktrace shows an order of invocations that takes place when an action listener is called:

((1)) at blah.blah.blah.ActionListenerTest.test(ActionListenerTest.java:122)
at sun.reflect.NativeMethodAccessorImpl.invoke0(Native Method)
at sun.reflect.NativeMethodAccessorImpl.invoke(NativeMethodAccessorImpl.java:39)
at sun.reflect.DelegatingMethodAccessorImpl.invoke(DelegatingMethodAccessorImpl.java:25)
at java.lang.reflect.Method.invoke(Method.java:597)
at org.apache.el.parser.AstValue.invoke(AstValue.java:170)
at org.apache.el.MethodExpressionImpl.invoke(MethodExpressionImpl.java:276)
at com.sun.facelets.el.TagMethodExpression.invoke(TagMethodExpression.java:68)
((2)) at javax.faces.event.MethodExpressionActionListener.processAction(MethodExpressionActionListener.java:99)
at javax.faces.event.ActionEvent.processListener(ActionEvent.java:88)
at javax.faces.component.UIComponentBase.broadcast(UIComponentBase.java:771)
at javax.faces.component.UICommand.broadcast(UICommand.java:372)
at javax.faces.component.UIData.broadcast(UIData.java:938)
((3)) at org.ajax4jsf.component.AjaxViewRoot.processEvents(AjaxViewRoot.java:321)
at org.ajax4jsf.component.AjaxViewRoot.broadcastEvents(AjaxViewRoot.java:296)
at org.ajax4jsf.component.AjaxViewRoot.processPhase(AjaxViewRoot.java:253)
at org.ajax4jsf.component.AjaxViewRoot.processApplication(AjaxViewRoot.java:466)
at com.sun.faces.lifecycle.InvokeApplicationPhase.execute(InvokeApplicationPhase.java:82)

I've marked interesting places with ((1)), ((2)) and ((3)). The first interesting method is ((1)) - that is where we throw an unchecked exception. The exception will be catched somewhere between ((1)) and ((2)) and wrapped into the ELException class. Then this exception will be caught in ((2)) as it can be seen here (sources are taken from Sun JSF RI 1.2.12):

public void processAction(ActionEvent actionEvent) throws AbortProcessingException {
if (actionEvent == null) {
throw new NullPointerException();
}

try {
FacesContext context = FacesContext.getCurrentInstance();
ELContext elContext = context.getELContext();
methodExpression.invoke(elContext, new Object[] {actionEvent});
} catch (ELException ee) {
Throwable eeCause = ee.getCause();
if (LOGGER.isLoggable(Level.SEVERE)) {
LOGGER.log(Level.SEVERE,
"severe.event.exception_invoking_processaction"
new Object[]{
eeCause == null ? ee.getClass().getName() : eeCause.getClass().getName(),
methodExpression.getExpressionString(),
actionEvent.getComponent().getId()
});
StringWriter writer = new StringWriter(1024);
if (eeCause == null) {
ee.printStackTrace(new PrintWriter(writer));
} else {
eeCause.printStackTrace(new PrintWriter(writer));
}
LOGGER.severe(writer.toString());
}

throw eeCause == null ? new AbortProcessingException(ee.getMessage(), ee) : new AbortProcessingException(ee.getMessage(), eeCause);
}
}
When the processActio methods catches exception it logs it and wraps exception cause into the AbortProcessingException. Here we come to place ((3)) which catches AbortProcessingException. The following is the source code from RichFaces 3.3.1.GA:

public void processEvents(FacesContext context,
EventsQueue phaseEventsQueue, boolean havePhaseEvents) {
FacesEvent event;
while (havePhaseEvents) {
try {
event = (FacesEvent) phaseEventsQueue.remove();
UIComponent source = event.getComponent();
try {
source.broadcast(event);
} catch (AbortProcessingException e) {
if (_log.isErrorEnabled()) {
UIComponent component = event.getComponent();
String id = null != component ? component
.getClientId(context) : "";
_log.error(
"Error processing faces event for the component "
+ id, e);
}
}
} catch (NoSuchElementException e) {
havePhaseEvents = false;
}
}
}
As you can see processEvents catches AbortProcessingException, logs it and does nothing! That is it!

I've tried a lot of solutions to solve this, I've tried to solve it with servlets/filters/phase-listeners/action-listeners and so on with no luck! Then I've solved it with last resort - AspectJ. The following aspect does the job perfectly:

@Aspect
public class RichfacesErrorIntercepterAspect {
@Around("call(* javax.faces.component.UIComponent.broadcast(..)) && within (org.ajax4jsf.component.AjaxViewRoot)")

public void callToBroadcast (final ProceedingJoinPoint thisJoinPoint) throws Throwable
{
try {
thisJoinPoint.proceed ();
} catch (final AbortProcessingException e) {
throw new RuntimeException ("Exception in action listener: " + e.getMessage (), e.getCause ());
}
}
}
To weave Richfaces's jar I've used the maven (I use it to build the project anyway):

<plugin>
<groupId>org.codehaus.mojo</groupId>

<artifactId>aspectj-maven-plugin</artifactId>

<configuration>
<complianceLevel>1.5</complianceLevel>
<weaveDependencies>
<weaveDependency>
<groupId>org.richfaces.framework</groupId>
<artifactId>richfaces-impl</artifactId>
</weaveDependency>
</weaveDependencies>
</configuration>

<executions>
<execution>
<goals>
<goal>compile</goal>
</goals>
</execution>
</executions>
</plugin>

Sunday, August 2, 2009

Richfaces or Trinidad with Facelets

I upgraded existing project from Java 1.4 to Java 1.5, JSF 1.1 to JSF 1.2, myfaces to sun ri... and decided to leverage a framework providing AJAX for JSF. The first I tried was richfaces. But it worked unstable and I spent 2 days trying to find a reason for it. Then I tried to use trinidad. It was the same. The framework worked but very unstable. For example. I opened a jsf page, if I clicked on a ajaxfied button just immediately after page appeared, then button worked OK. But if I clicked on the button after a while, then the button didn't work, the relevant page part was not updated! It looked like a magick in work. Then I noticed a very strange message which I noticed long time ago but didn't pay any attention to it. The message was "INFO: Facelet[/page/blah.xhtml] was modified @ 14:23:24 AM, flushing component applied...". A quick investigation revealed a root of my problem! It turned out that time in a virtual machine I used as a place for application server was 3 hours less then current time! And so file creation time of files in WAR-file was greater than time in the virtual machine. It looked like facelets framework had some strange algorithm based on current time to reload modified files (and flush components tree). Having set facelets.REFRESH_PERIOD context parameter in web.xml I solved the problem. Both richfaces and trinidad worked fine after that.

Monday, July 6, 2009

Simple DSL in Scala

Recently I started to use Scala for my hobby-project.I had heard that Scala made it possible to write a code in a way that it looked like a DSL embedded inthe Scala language itself. So I decided to try this feature myself. I needed some concise and convenient API to schedule messages for actors. The following is what I ended up with:

final class TimeSpec[T] (number : Long, action : Long => T) {
def nanoseconds = action (number)
def microseconds = action (number * 1000L)
def miliseconds = action (number * 1000L * 1000L)
def seconds = action (number * 1000L * 1000L * 1000L)
def minutes = action (number * 1000L * 1000L * 1000L * 60L)
def hours = action (number * 1000L * 1000L * 1000L * 60L * 60L)
def days = action (number * 1000L * 1000L * 1000L * 60L * 60L * 24L)
}

final class Trigger (actor : MyActor, payload : Any) {
def in (number : Long) = new TimeSpec[Unit] (number, scheduleIn)
def every (number : Long) = new TimeSpec[Unit] (number, scheduleEvery)

private def scheduleIn (nanos : Long) = Scheduler.inNano (actor, payload, nanos)
private def scheduleEvery (nanos : Long) = Scheduler.everyNano (actor, payload, nanos)
}

final class ActorSchedule (actor : MyActor) {
def payload (payload : Any) = new Trigger (actor, payload)
}

trait MyActor ..... {
protected val schedule = new ActorSchedule (this)
....
}


This code made it possible to schedule messages in a natural way, like:

object TestActor extends MyActor {
schedule payload `Hi in 10 nanoseconds

schedule payload `HowAreYou every 5 seconds

schedule payload `Bye in 5 days

def act () = {
case `Hi => println ("Hello!")
case `HowAreYou => println ("I am fine")
case `Bye => println ("Bye-bye")
}
}

The idea is that schedule is an object of class ActorSchedule. This class has method payload which takes a payload object as its argument. So "schedule payload `Hi" is actually an invocation "schedule.payload(`Hi)". This invocation will create an object of class Trigger. Trigger class has two public methods - in(Long) and every(Long). Because we cannot do anything until a time unit is given, we create an object of TimeSpec class passing to it a method (scheduleIn or scheduleEvery) that is to be run with number of nanoseconds when one of TimeSpec's methods is called. I think this API is concise enough with only small efforts taken to implement it.

Sunday, March 22, 2009

CeBootLin - Linux autoloader for WinCE on Loox 5XX (560/550)

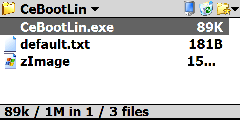
Here is the "bootloader" for wince to boot linux automatically on startup of PDA. It is not real bootloader because it has nothing to do with boot sectors, it is just a wince program which is able to boot linux as soon as possible. I have implemented it in this way because I didn't want to brick my PDA meddling with boot sectors or something. Also I wanted to have a way to skip loading of linux and let wince load itself. So here we are. It works. The code is based on haret (thanks guys!) but I cut off the parts I not used. Because the laoder uses hardware registers (GPIO/CPLD for leds and keybaord) of Fujitsu Siemens Loox N560/C550, it will not work for other PDAs. When CeBootLin is installed and PDA is turned on, wince begins boot process loading applications defined under the HKEY_LOCAL_MACHINE\init registery key. This way it loads CeBootLin. CeBootLin waits for 1 second, blinking with keyboard led. During the keyboard blinking, user can press any button to stop CeBootLin from loading Linux. If no button has been pressed during keyboard blinking, CeBootLin will search for \CeBootLin\default.txt and use this haret script to load Linux.

So, in essence, you should complete the following steps in order to install CeBootLin:
1. Download CeBootLin.
2. Unpack the downloaded archive into the PDA root. The CeBootLin.exe must be reachable with the path \CeBootLin\CeBootLin.exe.
3. Place default.txt under the \CeBootLin directory. The default txt might looks like this (if the Andorid is what you are going to load with CeBootLin):

set MTYPE 1454
set KERNEL "\CeBootLin\zImage"
set CMDLINE "root=179:3 mem=62M rootdelay=3 boot_delay=0 init=/init console=tty0 fbcon=rotate:0 androidboot.console=tty0 android.checkjni=1"
set RAMADDR 0xA0200000
bootlinux

4. Place zImage under the directory \CeBootLin\.

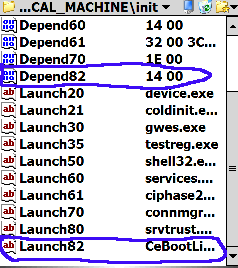
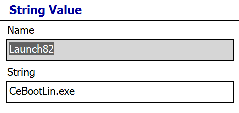
5. Modify HKEY_LOCAL_MACHINE\init adding Launch82 ="CeBootLin.exe" and Depend82 = 14 00.


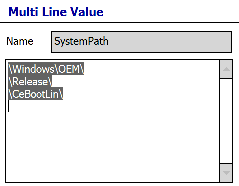
6. Modify HKEY_LOCAL_MACHINE\Loader\SystemPath adding a new directory \CeBootLin\ to the multi-string list.

7. Wait for 5 minutes (WinCE needs time to persist changes to registry).
8. Feel free to reboot your PDA

To test that CeBootLin is able to boot linux at all, run CeBootLin.exe manually.

It looks little bit complicated but later, setup program might be created to ship automatically bootable Andorid on Loox550. But before, Andorid must be polished.

Here is the source code of CeBootLinux. CeBootLinux is licensed with GNU GPL.

Sunday, March 15, 2009

Pictures of Linux and Android on Fujitsu-Siemens Loox N560


Today the desteny of WM5 is only to be replaced with Linux


Haret.. all you need is to press Run


Android on Loox N560


Installation of debian on Loox N560


Installation of debian on Loox N560

Memory tester for Loox N560/C550

Recently I've created a way to test memory for defects on Fujitsu-Siemens Loox N560/C550. Only one who upgraded (or wants to upgrade) PDA's memory from 64M to 128M needs this utility. Using this "util" it is possible to test memory immediately right after memory has been upgraded, without re-flushing WM5/WM6.

So do the following to test your PDA's memory:
1. Download either LooxMem128-v0.zip (to test 128Mb of memory) or LooxMem64-v0.zip (to test 64Mb of memory).
2. Unpack the downloaded archive onto SD.
3. Insert SD into your Loox and reboot it.
4. Don't let PDA fall asleep, start haret.exe which is in the directory where unpacked the archive to.
5. When haret.exe is started press Run.
6. Read the caution when Linux is booted.
7. Make up your mind and then either press RESET (insert a stylus into a hole on the bottom side of the PDA, if you don't want to test memory) or press enter..
WARNING: Poor memory chips might be damaged during the test (that is why you want to test your PDA's memory, isn't it?). None will be responsible for your actions except yourself!!

Note: You have to press any button during the testing process once per 5 or so minutes.
(In a case you need to port the utility on the other platform (not Loox C550/N560) the only thing you have to do is to replace zImage and modify default.txt to let the linux for your platform boot on the target device).)

Saturday, March 14, 2009

Linux Kernel for Fujitsu-Siemens Loox N560/C550 with support for CPLD and builtin leds

I've implemented support for CPLD and leds. htc-gpio driver is used with a custom list of CPLD registers/resources for Fujitsu-Siemens Loox 5XX (N560/C550). Now CPLD interface is available for all other drivers (existing and planned) of the linux/android kernel.

It is interesting how CPLD is implemented in the linux kernel. Actually CPLD is a chip that supports very simple custom logic (and that is the reason why it is much faster than CPU). CPLD chip has a set of input pins and output pins. All these pins are mapped to a region of memory address space. The most important work with CPLD is that modifying values of pins to control devices. This is done setting a value to 0 or 1. In fact, programming of GPIO (general purpose input/output of CPU) is done in the same way: a programmer writes code that sets a GPIO pin to either 0 or 1. Linux kernel already has support for GPIO which provides a set of functions for platform drivers. In addition, GPIO driver provides a way to map any virtual GPIO pin to some custom code that is responsible for handling of setters and getters for the mapped pins. And indeed, that is how htc-egpio driver does the job. The driver leverages gpiolib mapping CPLD registers to GPIO pins. Thanks to this approach, no addition functions are required to work with CPLD. It is enough to use gpio_set_value/.. methods.
After the CPLD driver had been implemented, it was possible to implement a driver for the leds of Loox N560/C550. The leds driver, I implemented, exports a set of functions that other drivers (wifi, gps, bluetooth, pm, ...) are supposed to use to control the leds. Also, the leds driver makes it possible to control the leds from userspace (shell scripts, java program, ...) using files under sysfs filesystem.

The following is the list of files exported by the leds driver and the possible content values for the each file:
/sys/devices/platform/loox5xx-leds.1/keyboard: on, off, any
- backlight for keyboard

/sys/devices/platform/loox5xx-leds.1/left_green: on, off, any
- green led on the left side. WM5 indicates WiFi activity with this led

/sys/devices/platform/loox5xx-leds.1/left_blue: on, off, any
- blue led on the left side. WM5 indicates Bluetooth activity with this led

/sys/devices/platform/loox5xx-leds.1/left_orange: on, off, any
- orange led on the left side. WM5 indicates GPS activity with this led on Loox N560

/sys/devices/platform/loox5xx-leds.1/right_green: on, off, any
- green led on the right side. WM5 allows programs to control this led using winapi.

/sys/devices/platform/loox5xx-leds.1/right_orange: on, off, blink, any
- orange led on the left side. WM5 indicates charging activity with this led

Where:
on - the led is on regardless of the kernel activity,
off - the led is off regardless of the kernel activity,
blink - the led is blinking regardless of the kernel activity,
any - the led is controlled by the kernel.

For instance, if the content of the right_orange file is set to 'on', then the orange led (on right side of PDA) will be on no matter what you do: plug or unplug your device to/from a cradle. The driver will hold on the state of the led until, you write 'any' into the file right_orange. With 'any' value in file, the first 'power' event will change state of the led. The interface of the driver makes it possible to implement any notification (low battery, new mail..) effects you can imagine involving all leds of the device. The following script demonstrates how to blink with the keyboard backlight led:

while true;
do echo on > /sys/devices/platform/loox5xx-leds.1/keyboard;
sleep 0.1;
echo off > /sys/devices/platform/loox5xx-leds.1/keyboard;
sleep 0.1;
# Condition for break...
done
echo any > /sys/devices/platform/loox5xx-leds.1/keyboard;

The current patch for the android cupcake kernel is located here.

Tuesday, March 10, 2009

Cross-Packaging On Debian

Debian/Emdebian already has tons of packages. But sometimes you have a need to package or repackage a piece of software yourself. The following may be helpful if a platform you build for is not the platform you build on.

Use the following command to build a package from a repository of apt:
emsource --arch armel -b memtester

If you need to install a package for target on your host:

dpkg-cross -a armel -i zlib1g-dev_1.2.3.3.dfsg-13em1_armel.deb
The command dpkg -l | grep zlib1g will show you:

ii zlib1g-dev-armel-cross 1:1.2.3.3.dfsg-13em1

(dpkg-cross automatically converts package names and moves content under the /usr/arm-linux-gnueabi (for armel target))

You need to configure ~/.apt-cross/emsource to use emsource without privileges of root. The content of the file may look like:

workingdir: /home/akshaal/.apt-cross-working-dir

In a case you need to build a package from sources that have already been downloaded, use the following command:

dpkg-buildpackage -aarmel

Sunday, March 8, 2009

Install emdebian on ARM device

Here is how I've successfully installed emdebian on my Fujitsu-Siemens Loox N560. I assume there is an already installed emdebian-tools package and cross-compilers. Next thing is to run the following commands:
cd /tmp;
mkdir grip/
sudo debootstrap --arch=arm --foreign lenny grip/ http://www.emdebian.org/grip/
cd grip/
sudo tar -czf /tmp/emdebian-grip-arm-debootstrap.tgz .

Then SD card is to be partitioned with fdisk. For example it could be:

cfdisk /dev/sdX
mkfs.ext3 /dev/sdXy

where sdX - is a device for an SD card. And sdXy is a partition that is supposed to be used for linux on the SD card. Then mount the linux partition and untar the emdebian-grip-arm-debootstrap.tgz:

mount /dev/sdXy /mnt
cd /mnt
tar zxpvf /tmp/emdebian-grip-arm-debootstrap.tgz
ln -s bin/sh init
cd /tmp
umount /mnt

Now we can boot linux from the partition. When linux has booted and a command line appeared, run the following commands step by step:
cd /debootstrap
export PATH=/usr/local/sbin:/usr/local/bin:/usr/sbin:/usr/bin:/sbin:/bin
run ./debootstrap --second-stage
dpkg --configure -a
rm /init
cd /
ln -s sbin/init init

Now it is time to reboot linux again. This time a login prompt should work. Use root login and no password. Then configure basic settings:

echo 'nameserver 1.1.1.1' > /etc/resolv.conf
echo '127.0.0.1 localhost' > /etc/hosts
echo '172.16.0.2 myhost 172.16.0.2' >> /etc/hosts
echo 'myhost' > /etc/hostname

use actual nameserver IP instead of 1.1.1.1. Reboot PDA one more time. Then configure network:

ifconfig usb0 172.16.0.1 netmask 255.255.255.0
route add default gw 172.16.0.1
Make sure network is up and running. Then upgrade your installation:

echo 'deb http://www.emdebian.org/grip/ sid main' > /etc/apt/sources.list
apt-get update
apt-get dist-upgrade
apt-get install ...whateveryoulike...

And configure network properly.
cat > /etc/network/interfaces
auto lo
iface lo inet loopback
allow-hotplug usb0
iface usb0 inet static
address 172.16.0.2
netmask 255.255.255.0
network 127.16.0.0
broadcast 172.16.0.255
gateway 172.16.0.1
dns-nameservers 1.1.1.1
dns-search your.domain